
The motorcycle world is full of its own jargon, which can easily lead to some confusion when it comes time for repairs or maintenance work. A bike’s electrical system is a great example. While cars, trucks, and SUVs charge their batteries through an alternator, motorcycles work a little bit differently. Instead of a traditional alternator, motorcycles use what’s known as a stator. This, along with a voltage regulator/rectifier, comprise the bike’s battery charging system. The stator performs much the same role as a normal alternator with a few key differences. Primarily, a stator is much smaller than the typical alternator, which makes sense when you consider the lack of real estate on your average motorcycle.
If you’re dealing with electrical issues on your bike, including a dead battery, dim headlights, or inconsistent performance from various electronic accessories, you could very well be seeing the effects of a malfunctioning stator or regulator/rectifier. Of course, there could be any number of issues that could lead to such problems, which is why it’s so important to learn how to troubleshoot the issue. Unfortunately, a stator cannot be easily tested, but regulator/rectifiers are a different story altogether. Read on as we explain some of the basics tenets of a motorcycle’s battery charging system, learn how stators, regulators and rectifiers work, and share step-by-step instructions for performing your own at-home diagnostic testing.
What Is a Stator?
Like an alternator, a stator converts mechanical energy into electrical energy. The engine’s crankshaft provides the mechanical energy to spin the stator, rotating a set of magnets past some coils to produce an electrical current. This current is then sent back to the bike’s battery, providing all the power you need to start the engine and run all of the bike’s various electrical systems.
The process sounds simple enough, but things get a little complicated due to the fact that stators produce an alternating current (AC) of electricity. In order to top off the motorcycle’s battery, this electrical current must be converted from AC to direct current (DC), which is where the voltage rectifier comes in.
What Is a Rectifier?
In order to understand the role of a voltage rectifier, we first have to brush up on some electrical engineering basics. When an electrical current is produced using magnets and coils, the resulting voltage is delivered in a wave that alternates between positive and negative. This is alternating current. Think of the magnets as essentially pushing and pulling current through the stator’s wires, creating peaks and valleys that resemble a wave.
In order to convert this alternating current into a direct current, which only flows in one direction, we need to lose the bottom half of that wave, eliminating the negative “valleys” to convert the electricity into a purely positive current that the battery can use. This conversion is done by the voltage rectifier, which uses a series of diodes to prevent the negative half of the wave from getting through, essentially “rectifying” the current into a usable form. Diodes are small electric components that only allow current to flow in one direction, so by sending our AC current through this gauntlet of diodes, we can ensure that only the positive part of the wave makes it through. A motorcycle stator usually has three individual coils. Since there are two diodes responsible for handling the current from each of these coils, you’ll usually find six diodes inside the typical rectifier.
What Is a Regulator?
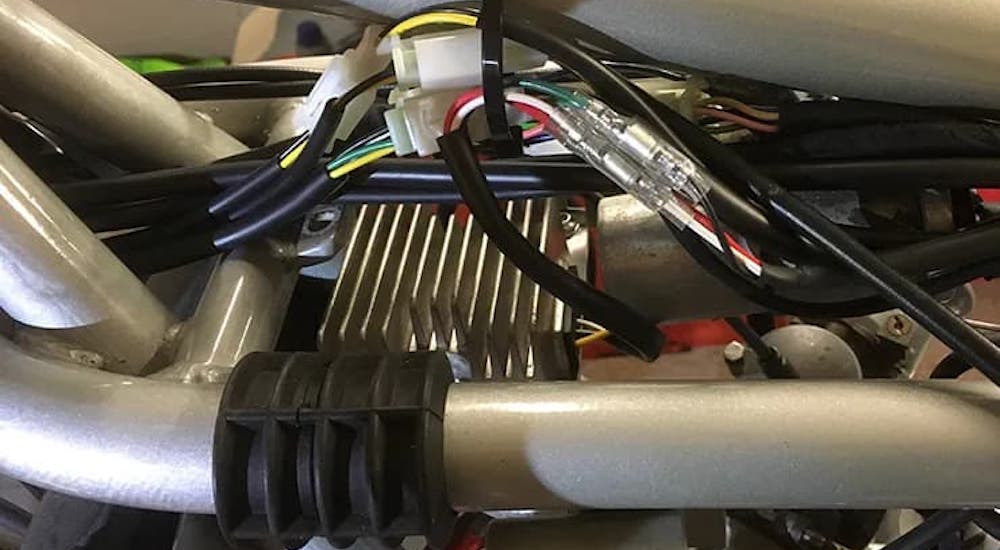
That brings us to the regulator. While this component is packed onto the same circuit board as the rectifier, it actually serves an entirely different purpose, albeit one that’s crucial to the battery charging system. A regulator monitors the voltage of the current coming from the stator and rectifier, and keeps it within a healthy limit. Ideally, a motorcycle battery is looking for around 14.6 volts to charge correctly. When the engine RPMs start to climb, the rapidly-spinning stator can generate a higher voltage than the battery, as wel as your bike’s electrical system, can handle. To solve this issue, a regulator relies on a series of shunt switches which can bleed off the excess current by temporarily sending it to ground. This excess electricity is then dissipated in the form of heat, which is why regulator/rectifiers contain large heat sinks to help this process.
How to Test a Rectifier
A faulty rectifier is relatively easy to test thanks to the fact that it can be removed from the bike for diagnosis. Start by finding the plug that connects the rectifier to the stator. If your stator has three coils, there should be five wires leading from the stator to the rectifier. There will be one wire for each coil all the same color, one positive wire, and one negative wire. The colors of these wires can vary from one bike to another, so verify which color corresponds to what wire. Pop the connector off to access the end of each wire, and you’re ready to proceed.
Next, you’ll want to grab a multimeter and set it to its diode testing function (look for the symbol that resembles a triangle with a line over it), which is often shared with one of the multimeter’s resistance settings. The multimeter will allow us to measure how much voltage is moving through each diode. Ideally, we should see a voltage drop of between 0.3 and 0.8 volts when testing each stator wire’s positive diode, and a reading of 1 or OL when testing the negative diode, which confirms that no current is passing through.
Start by connecting the red multimeter lead to the red battery positive wire, and then connect the black multimeter lead to each of the three stator wires. If everything is working correctly, each connection should return the 1 or OL value we mentioned above. Now connect the red multimeter lead to the battery negative wire, and connect the black multimeter lead to each stator wire. This test should return a value between 0.3 and 0.8 volts, depending on the system’s specs.
Repeat this process for the next set of diodes, starting with the black multimeter lead instead of the red lead. Connect the black multimeter lead to the red battery positive wire and touch the red multimeter lead to each stator wire to ensure a value between 0.4 and 0.8. Finish by connecting the black multimeter lead to the battery negative wire and the red multimeter lead to each stator wire, keeping an eye out for a reading of 1 or OL. If any of these readings fall outside of the prescribed limits, it’s a good sign that your bike’s electrical issues are related to the rectifier.
This can be a lot to keep track of, which is why we’d recommend making a chart to keep all your readings straight. You don’t need to come up with anything too fancy, just a simple chart that helps you to keep track of the results as you go. If you’re looking for a ready-made example, the folks at RMSTATOR have put together a handy template.
How to Test a Regulator
Unlike a rectifier, a motorcycle’s regulator can only be tested when the bike is running. This makes the process a little more difficult, but by no means impossible. The regulator test is also a lot simpler than the rectifier testing process as it only requires one reading.
Start by making sure the rectifier/regulator is firmly connected to the stator,. Set the multimeter to the 20-volt DC voltage setting, then connect the red and black multimeter leads to the motorcycle battery’s positive and negative terminals respectively. Start the engine to run this test. With the multimeter connected to the battery, start up the engine and see what your baseline battery voltage looks like. Again, it varies by model, but 14.6 volts is generally the neighborhood you’re looking for.
Now it’s time for a little stress testing. Remember, a regulator is designed to prevent excess current from reaching the battery, so to perform this test we’re going to need to rev the bike up to the RPMs one would experience during the average ride. The typical charging system reaches peak output at around 5,000 RPM, so those are the conditions we’ll recreate for this test.
Rev up the engine and keep an eye on the multimeter to ensure it doesn’t jump above the 14.6-volt mark. If it does, this is a good indication that your regulator is doing its job, bleeding excess charge out of the system before it can reach the battery. Keep revving up to 5,000 RPM. If there’s no noticeable change in voltage, the regulator probably isn’t the issue.
Signs of a Faulty Regulator/Rectifier
A failed regulator/rectifier can cause any number of problems with your motorcycle. If you are experiencing any of these, run the tests described above to determine if this is the cause.
Dim or Flickering Headlights
If your bike isn’t getting all the electrical power it needs, your headlight will often be the first sign. A dim, underpowered headlight is a good indication that there’s something amiss with your battery charging system. A flickering headlight can also be a warning sign, as it could indicate an overcharged system. Either way, it usually means it’s time to perform a regulator/rectifier test.
Slow Starts
If your battery charging system is on the fritz, it means your battery probably isn’t getting all the power it needs to perform its main function: starting up the vehicle. If you’ve been having some slow starts as of late, and there hasn’t been a massive drop in temperature, a faulty stator, rectifier, or regulator could be the cause.
Dead Battery
If a battery charging system has completely failed, or has been overtaxed, you might not even get a half-hearted attempt at a start out of your bike. A dead battery is a common sign that’s there’s something amiss with the battery charging system. A quick check of the regulator/rectifier should help you to confirm the issue. If it’s good, then the battery itself might have failed, especially if it’s more than a few years old.
Electronic Malfunctions
Your headlights aren’t the only thing that relies on electricity to do its job. If you’ve experienced underwhelming performance from your ignition, fuel pump, injectors, turn signals, brake light, or even your horn, they might not be getting the power they need. A failed regulator/rectifier could be the cause.
Performing your own at-home diagnostic test is one of the easiest ways to bring down the cost of a repair or maintenance task. Instead of paying a mechanic to suss out the problem at $140 an hour, a confident DIYer can simply perform the grunt work themselves. Granted, some tasks are beyond the average home mechanic, but a simple regulator/rectifier issue can usually be diagnosed with nothing more than a little busy work and a $30 multimeter. Even if you aren’t able to solve the problem on your own, narrowing down the possibilities means that much less work and billable labor for a garage or dealership. Electrical work can be a little intimidating, but cars, trucks, and motorcycles are a little less fraught with danger thanks to the fact that you’re rarely working with anything approaching high voltage. The next time you notice some flickering headlights, a slow start, or other mysterious electrical gremlins, grab a multimeter and dive right in.