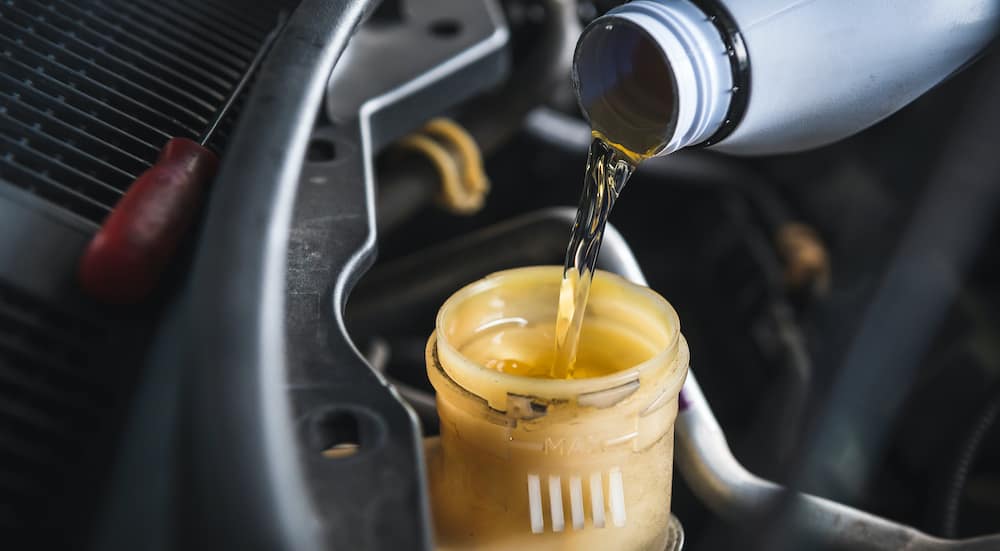
To those not familiar with automobiles, brake fluid might sound like a fictional substance. But quite unlike the fictitious blinker fluid, keeping your brake fluid up to date and properly managed could mean the difference between stopping at a red light and plowing into oncoming traffic. When getting a Toyota brake service, one might ask what does brake fluid do, and do you need to replace it regularly?
Brake fluid takes the force you apply to the brake pedal and transfers it to the brakes themselves so they can do what’s asked of them. While it generally does not need to be replaced, it always helps to have the brake system “bled” regularly. Bleeding the brakes is a simple procedure that removes accumulated air bubbles from the system, bringing back a firm and confidence-inspiring brake pedal feel. Air in the system, in extreme cases, can even lead to a loss of braking ability.
Brake Service
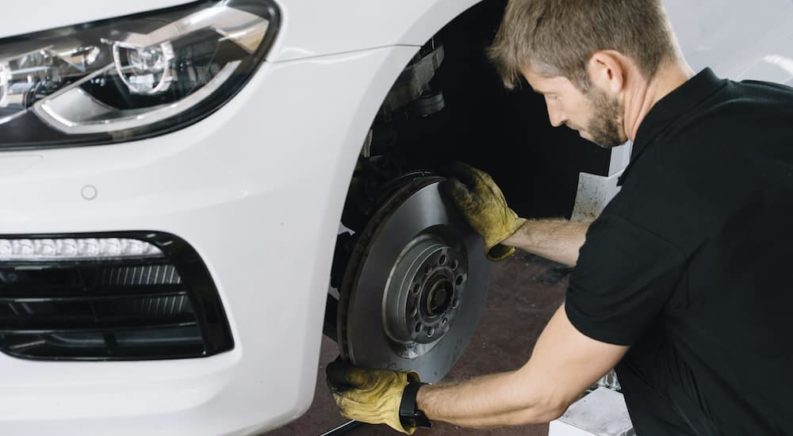
A brake service is a simple operation that is nevertheless obvious in its importance. While it is rare that you need to bleed the lines or change the brake fluid, regular brake service is vital. In a normal brake service, the brake pads are replaced, and the brake fluid level is checked. You may also have the brake rotors resurface or replaced if they are warped or worn down. This overview will look at a brake pad replacement, the most common brake service for Toyota or any other car.
Tools
Only straightforward tools are needed for brake pad replacement, and the procedure itself is pretty easy.
- Thick disposable gloves are a great way to protect your hands from the hard metal edges they might come into contact with, and they will also keep your hands clean.
- A ratchet set will be needed, with sockets that fit the wheel lug nuts and the caliper bolts. A wheel key will be needed if your car has wheel locks, and a breaker bar wouldn’t hurt when trying to get the lug nuts and bolts off.
- A caliper compressor or large C-clamp will be helpful in retracting the piston inside the caliper. If your car has screw-in pistons, a specialized tool will make compressing the pistons vastly easier.
- A jack and at least a pair of jack stands are needed to work with the vehicle safely. The jack stands hold the vehicle up, while the jack itself is used to raise and lower the vehicle onto and off of the jack stands. A jack by itself is not meant to hold up a vehicle and should never be used without jack stands.
- When jacking the vehicle up, large objects such as rocks or wood will be useful to chock the vehicle’s tires and keep it from rolling.
Parts
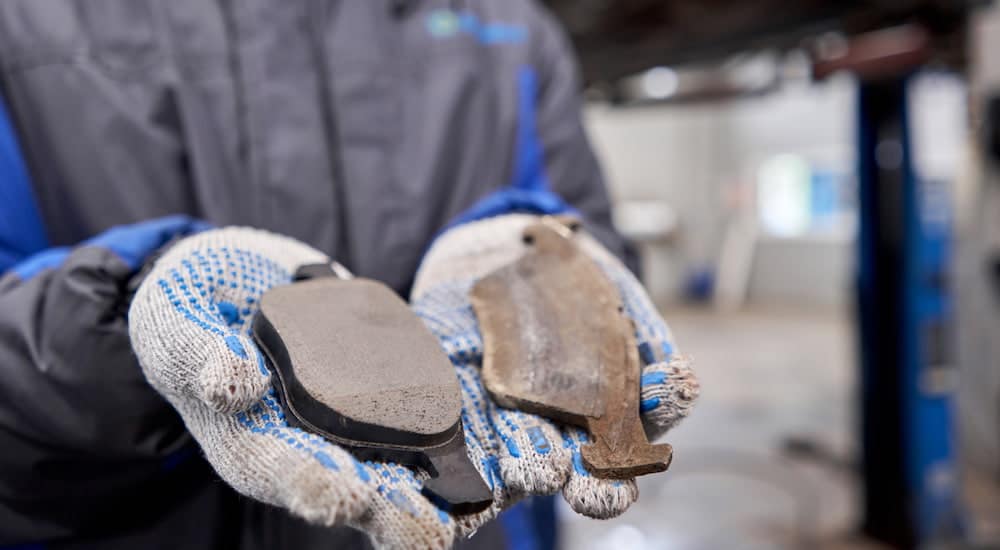
The front and rear brake pads, along with the associated hardware, are the only parts that would be used in a normal brake service. New brake fluid is not technically necessary, but if topping up or bleeding the brake fluid reservoir, it helps to be prepared. The hardware required to install the brake pads will usually come with them. Be aware that in some cases, the rotors will need to be changed along with the pads.
Prep
Gather the required tools, parts, and paraphernalia. Make sure everything required is within reach, and then clean out a work area and chock the vehicle on a level surface.
Removal Steps
With the vehicle on a level surface and chocked, the first step is the jack up the front of the vehicle. Always check the owner’s manual for the jack points to use. Jack the car up so that the tire closest to the jack point is just above the ground. Remember that the suspension will need to decompress before the tire leaves the ground. Once the vehicle’s corner is airborne, set up a jack stand in a location specified by the owner’s manual.
Now that one end of the vehicle is suspended securely by the two jack stands, use the ratchet to remove the wheels. Once the wheels are off, loosen and remove the caliper slider bolts. These elements keep the caliper closed, and removing them will allow the brake pads to slide out. Remove the pads, and now you are ready to slide in the new set. Remember that you will have to repeat this removal process on all four corners of the vehicle.
Replacement Steps
Lubricate the retaining clips with the pad kit’s included packet of grease, taking care NOT to get any lubricant on the pad or rotor surface. Excess lubricant or grease on the pads will reduce your stopping power. Then replace the retaining clips.
Install the new pads into the caliper. Use the caliper compressor or C clamp to retract the piston or pistons in the caliper so that the caliper will fit over the new (thicker) pads. Ensure that the brake master cylinder’s fluid levels do not overflow during this step.
Now that the caliper has been prepared, reinstall the slider bolts. Close the caliper up, making sure to tighten the fasteners and make sure there are no leftover parts from the process. Remember that both the removal and replacement steps need to be repeated on all four corners of the vehicle.
Clean Up
Once the pads have been replaced, it is time to reinstall the vehicle’s wheels. Wheel install is best done with a technique that allows it to be safe even without a torque wrench to measure how much torque is being put on the lugs holding your vehicle’s wheels on. First, slide on the wheel and get every lugnut finger tight on the hub’s threads. Then, using the ratchet, tighten the lugs in a star pattern. That is, tighten the lugs one after the other, moving clockwise, but skip the lug immediately next to the one you are tightening. Skipping a lug like that ensures the wheel seats well on the hub.
Repeat this step on all four corners of the vehicle to get it ready to return to the ground. Lowering the vehicle back down onto its newly reinstalled wheels is the same procedure as raising it but in reverse. Remove and dispose of your gloves, and then make sure the old pads and hardware are also disposed of responsibly.
Bed-in Procedure
Before going anywhere, get in your car, turn it on, and pump the brake pedal repeatedly. This step is vital to getting the brake fluid circulating through the lines, and you will not have any braking force until you do so. It only takes a few pumps, and you will feel it when the brakes are back to normal.
Commonly overlooked, brake pads generally need to be bedded in to ensure maximum performance and safety when driving. Brake bed in is a one-time process that is like an athlete warming themselves up. The instructions to properly bed in the brakes will have been included with the pads themselves. Generally speaking, a brake bed in will require several hard stops from moderate speed to wear the brakes in.
Enjoy Your New Brakes
A brake service is not a hard job to do, especially when only pads need to be replaced. One would know they need brake pads when the brakes squeak on the application of the brake pedal. Bleeding brakes, replacing rotors, and other work relating to the brakes is similarly simple, but in those cases and the case of pad replacement, the easiest way to get it done is to have a professional take care of it.