In a world where social media has crept into nearly every facet of daily life, video is king. From viral TikTok dances and Instagram reels to YouTube personalities and Twitch streamers, life is increasingly being served to us at 30 frames per second. This phenomenon has even crept into the automotive world, where onboard video recording has become easier than ever with the advent of affordable, high-definition dash cams.
Whether you’re an aspiring YouTube superstar or just want to record your ride for posterity, dash cameras can be an excellent way to capture all your high-speed antics. They can also be a priceless tool in the unfortunate event of a hit-and-run, serving as a so-called “silent witness” and giving you all the evidence you need to fend off the insurance company or guarantee victory in small claims court. Installing dash cameras isn’t one of the trickiest tasks you’ll face as a driver, but there are still some important tips and tricks to keep in mind if you’re looking to channel your inner Spielberg. Today’s dash cams come in all shapes and sizes, so while specific installation instructions depend on the model you choose, we’ve compiled some general guidelines that should make the whole process pretty foolproof.
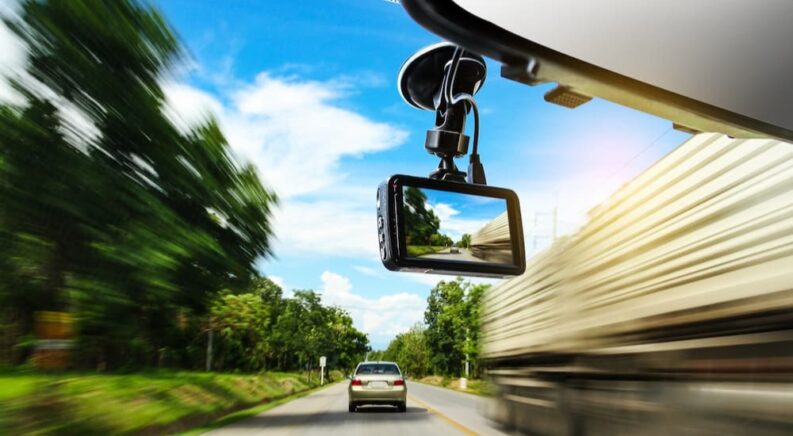
Camera Placement
Placement is one of the most important factors when it comes to installing a dash cam, but again, it all depends on which model you go with. Most dash cams either mount to the vehicle via a reusable suction cup or a one-time-use adhesive strip. If you opt for the suction cup version, the initial placement isn’t a big deal, as the dash cam can always be remounted as you search for the perfect angle through trial and error. If, on the other hand, your dash cam comes with an adhesive mount, you might only get one shot at installation, so it’s important to make sure you get it right the first time.
There are two things you want to keep in mind when choosing a location for your dash cam: getting it as close to the vehicle’s centerline as possible and making sure it’s not obstructing your view of the road. Placing the camera on the centerline ensures a good, wide-angle view of the road when you go to review your video, while the obstruction issue is more of a legal matter. While dash-mounted cameras are legal in all 50 states, the law often states that they need to be placed in a location where the driver’s view isn’t obstructed. Windshield-mounted cameras, which often obscure the view of the road, are banned in many states for this very reason.
When it comes to choosing a spot, experts recommend two prime locations: behind the vehicle’s rear view mirror or towards the front of the dash where it meets the windshield itself. Both of these locations are unobtrusive and central, ensuring good coverage while still hidden enough to prevent distractions. Some dash cams include a rear-facing camera that can capture the interior as well as the road ahead. This is perfect for logging driver’s reactions––specifically the funny faces we tend to pull when faced with a particularly harrowing turn or obstruction––but can cause some problems when it comes to placement. Lodging the camera behind the rearview mirror will render the rear-facing camera virtually moot while placing it too far forward on the dash carries a similar risk. As always, use your best judgment and try to find a happy medium between functionality and safety.
No matter how hidden or centrally placed a dash cam is, it’s not going to be of much use if it’s pointed directly at the sky or only offers an up-close view of your hood. Leveling a dash cam is just as important as placing it, but again, it all depends on which model you go with. Some newer and more expensive models include a startup guide complete with a leveling function. Simply monitor the dash cam’s integrated display or the feed from your smartphone and subtly adjust the angle until you’ve framed it just right. If you opt for a cheaper model that doesn’t offer such a function, it’s time to break out the good old-fashioned level. Again, getting a correct angle is less of an issue if you’re dealing with an easily remountable camera that uses a suction cup, but it can be well worth the time and effort if you’re faced with the one-time use adhesive tape variety.
Connection and Power
Once you’ve found the perfect spot for your dash cam, it’s time to get it all wired up. Again, this will depend on the model you go for, but generally speaking, all dash cams require some sort of wired connection. This is less true of a portable action camera like a GoPro, which can run solely on battery power, and while those can serve as a dash cam in a pinch, they lack some key features of purpose-built models.
The simplest way to connect most dash cams is through that age-old solution for interior accessories: the cigarette lighter adapter (CLA). While it’s rarely used for its original purpose these days, it does provide a quick, simple way to power a dash cam. Simply plug the camera’s CLA adapter into the port, and you’ll be capturing footage in no time. The major drawback of this approach comes down to its lack of tidiness, as the cable running from the camera to the port tends to flop around on the dash and give the whole setup a less-than-professional appearance. This can be alleviated with some zip ties or adhesive but will still lack the seamless qualities of some other methods.
If your vehicle has a powered rear view mirror, dash cam installation can be as easy as jacking into the mirror’s existing power port. Simply invest in a power splitter––after making sure it’ll work with your specific make and model––and you’ll have instant access to a power supply right where you need it. These splitters tend to run around $30, but that’s a small price to pay for being able to hide away the camera and any of its cables so effectively. Also, note that not all powered rear view mirrors receive a steady stream of 12-volt power, so double-check your vehicle’s specs unless you want the feed cutting off mid-ride.
Connecting the dash cam directly to a vehicle’s fuse box is one of the most popular options and for good reason. The cables can be easily hidden away, providing a near-seamless experience that will make for a neat-looking dashboard. Hardwiring a dash cam also ensures a constant supply of power, meaning the camera can record the goings-on in and around the vehicle even when the engine is off. This can prove an important security feature for drivers who want to keep an eye on their vehicle from afar, though it does run the risk of draining the battery. Some dash cams feature a g-sensor that will automatically power on the camera when the vehicle is in motion or it senses nearby activity, but those lacking such functionality can easily drain a car battery within a day. It’s also important to take an honest inventory of your electrician skills before diving into the hardwiring process. Even at 12 volts, an electric shock is no fun, so make sure you take proper precautions and know your way around a fuse box before diving into this one.
If you’re looking for a slightly less technical alternative to the fuse box method, your vehicle’s OBD-II port is here to help. You’ll most likely be familiar with the OBD-II port as that weird trapezoid near your left knee that an auto service technician will use to rear diagnostic trouble codes (DTC) or clear a Check Engine light, but it can also be used to power some dash cams. These OBD-II power cables can be found online for as little as $15 and will work with almost any vehicle produced since the late ’90s. Sure, you’ll have to remove it if you need to access the OBD-II port for diagnostic purposes, but with any luck that won’t be a very common occurrence.
Lastly, there’s the battery option. As dash cams have become an increasingly popular aftermarket accessory, a number of brands have started producing standalone battery packs designed specifically to power such equipment. Retailing between $200 and $350, they aren’t cheap, but they can be a vital investment if you’re looking for 24/7 video surveillance. Instead of draining your vehicle’s main battery, these battery packs keep the camera running day and night, recharging via the CLA port whenever the vehicle is in use and storing up that power for the off-hours. In addition to offering all-day protection, these battery packs can also increase the camera’s recording length, connect to Wi-Fi and GPS through smartphone integration, and more.
Explore the Fun of Having a Dash Cam
If you’ve never experienced the novelty of a dash cam, it might be hard to see the appeal. After all, who wants to relive their morning commute in real time? It’s a different story when it comes to those who like spending long days at the track, many of whom might find the footage to be more compelling than the latest Hollywood blockbuster. Dash cams give these drivers a chance to study every turn, tease out bad habits, and give a unique POV that can go a long way in improving their lap time. Dash cams can also serve an important security function, acting as the all-important silent witness or giving drivers the ability to monitor their vehicle from afar through connected apps. No matter what your reason for installing a dash cam is, it’s a relatively simple task that leaves you little excuse for letting your automotive exploits be lost to history.