Modern cars are filled with electrical components, and like any automotive component, they can go bad or fail. Unfortunately, unlike mechanical components, diagnosing an electrical problem can rarely be accomplished by sight alone. Unless you are fortunate enough to have an obvious broken wire or a blown fuse, you are going to need a testing device to discover the root cause of any electrical issues. While there are many highly specialized diagnostic systems, the vast majority of electrical issues can be tracked down with the humble multimeter. With basic models available for a few bucks at nearly any hardware store, every DIY mechanic should have a multimeter in their toolbox.
What Is a Multimeter?
For those of you not familiar with the term, a multimeter is a basic electronic diagnostic tool. Usually taking the form of a small hand-held box connected to two long wires (one red and one black), a multimeter can be used to measure voltage, amperage, and resistance. These multiple uses are what give the multimeter its name and are what make it such a handy tool for solving a huge variety of electrical issues. However, while all multimeters have the same basic functions, they vary tremendously in sophistication and features.
The simplest analog multimeters can be found for less than $10 and are all you need for your basic DIY automotive work. On the other end of the spectrum, a top-of-the-line multimeter can run you hundreds of dollars and will provide several nifty advantages that can make troubleshooting quicker, easier, and even safer. If you are getting your first multimeter and are a semi-serious DIY mechanic, it is generally best to aim somewhere in the $25-50 range. Multimeters at this price point may not have all the capabilities of a high-end unit but will have enough convenience features to make your life a bit easier than a budget unit.
There are a few things to keep in mind when shopping for a multimeter:
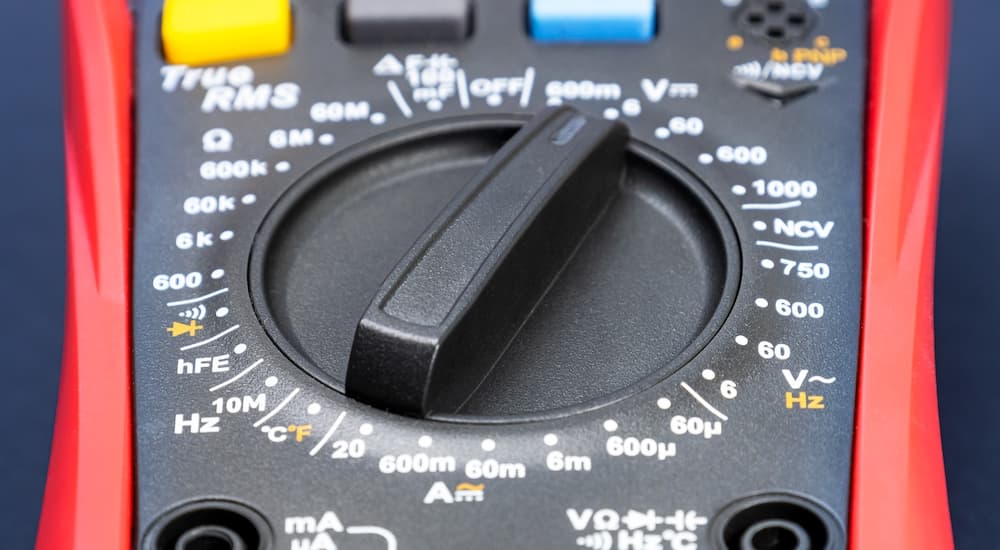
- Analog vs Digital – Cheap multimeters tend to be analog, which means they display readings using an old-fashioned swinging needle. While simple, analog meters tend to be difficult to read and can be more confusing for novice users. In general, you are better off looking for a digital multimeter.
- Auto-Ranging – With a basic multimeter, you will not only need to select what you are testing for (more on that later), but you will also need to choose the scale you are testing on. Choose the wrong scale, and you will get a nonsensical reading or even damage the multimeter. An auto-ranging multimeter will automatically determine the appropriate scale and display the most useful figure. Almost all users find auto-ranging units to be easier to use, but some people prefer manual control of a non-auto-ranging multimeter.
- Fusing – Better multimeters will have a separate fused circuit for testing amperage. The addition of a fuse will protect the tool and the user from higher amperage circuits, but it is not a strictly necessary feature for basic electrical diagnostics. If you are buying a fused multimeter, check the rating of the fuse as it can vary significantly depending on the quality of the multimeter.
- Leads – The red and black wires leading from a multimeter are known as the “leads” and, while only a peripheral part of the tool, having the right leads can make your job much easier. Cheap multimeters will generally only come with basic straight probes, which are versatile but can be a pain to use. High-end units can come with a collection of different leads, each designed for a different task. Fortunately, you can easily buy additional leads to upgrade your multimeter down the road.
How to Use a Multimeter
When you get your first glimpse at a multimeter, you might wonder why your new tool is covered in ancient Egyptian hieroglyphics. Cheap non-auto-ranging multimeters might be the worst offenders here, as auto-ranging units have far fewer settings to choose between, which is part of what makes them more newbie-friendly. However, some basic electrical knowledge is all you need to make sense of the confusing displays. As we mentioned, a multimeter has three basic functions:
- Voltage (V) – This will usually be found twice: once for AC current (~) and once for DC current (⎓). Automotive electrical systems are primarily DC, so that is the setting you will use the most.
- Amperage (A) – If you have a fused multimeter, there will be three rather than two sockets to connect the leads. When measuring amperage, make sure you place the positive (red) lead into the socket labeled for amperage.
- Resistance (Ω) – While voltage and amperage are passive measurements of the current in the system, resistance is an active measurement of how difficult it is to send a current through the system. This means that the resistance setting is actually sending out its own electric current and should not be used on a live circuit.
If you have an auto-ranging multimeter, simply set the system to the appropriate unit, and you are almost ready to measure. If you don’t have an auto-ranging unit, you will need to choose your scale. Car batteries nominally operate at 12.6V DC, and a running car can supply up to 14.8V DC, so you will generally want to set your multimeter to “20V⎓” to get a useful reading. If you are measuring amperage or resistance, then the setting you use will depend on the system you are testing
The final step before you start measuring is to calibrate your multimeter. If you do not properly calibrate a multimeter before use, you will not get accurate readings. An analog multimeter will usually have some simple adjustment wheels or screw to set the maximum travel of the needle, while a digital multimeter will simply have a button (usually marked “REL”). In both cases, the process is relatively similar.
For both analog and digital multimeters, set the tool to “Ω” and touch the leads against each other. If the reading isn’t “0” then it needs to be calibrated. For a digital multimeter, simply press the reset button while holding the leads together until “0” appears on the display. For an analog multimeter, you will need to turn the calibration knob until the needle is aligned with “0” on the scale. Once the multimeter is calibrated, you are ready to go.
What Can You Measure With a Multimeter?
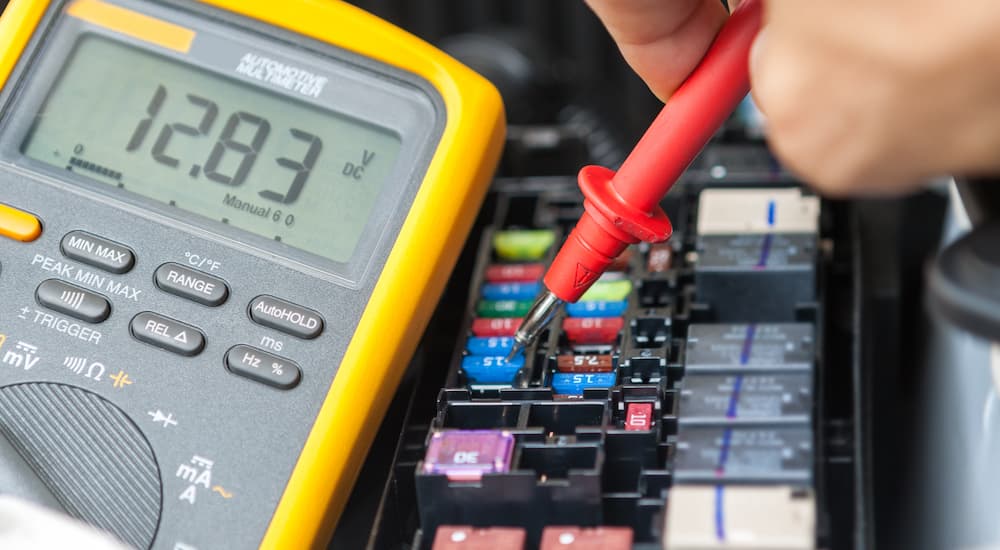
The most common uses of a multimeter are simply to verify the presence of a current or a break in a circuit. While there are plenty of other uses for a multimeter, these are the two that you will need to be the most familiar with. The most important thing to remember whenever you use a multimeter is that electricity can be dangerous. Before you start poking at wiring, familiarize yourself with your vehicle’s wiring diagram. Most of the wiring in your car is 12V, which is perfectly safe to touch. However, the ignition components can carry some extremely high voltages and damaged or improper wiring presents a very real risk of fire.
The simplest way to use a multimeter is to confirm that a circuit is intact and has no interruptions. This uses the resistance setting (Ω) on the multimeter is rather easy to understand. Touch the leads together, and you have an intact circuit with effectively zero resistance. Separate the leads, and you have a broken circuit with effectively infinite resistance. If you touch the leads to the different ends of a wire, you can apply this principle to determine if the section of wire in between the leads is intact (low resistance) or damaged (high resistance). Just make sure that there is no other current running through the wire and, if possible, try to lightly jiggle the wiring to test for intermittent failures. Many multimeters have a special continuity setting that will beep if the circuit is intact, simplifying the process.
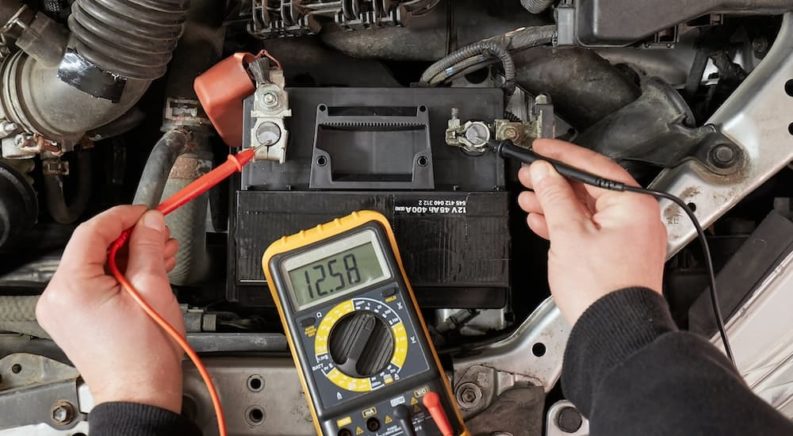
Testing to confirm the presence of a current is nearly as simple, but in this case, you will be working on a live circuit and using the voltage setting (20V⎓). If you try to test for the presence of a current when the circuit is turned off, you will obviously not get any readings even if the system is functioning properly. The simplest system to check is the car battery––it is easy to access and is always powered. Simply connect the positive (red) lead to the positive battery terminal and the negative (black) lead to the negative terminal and your multimeter should read 12.6V, showing the presence of a current (it is fine if the battery is a bit lower than that). This same principle can be applied to any other electrical system in your vehicle.
It’s Time to Start Diagnosing Your Car
Operating a multimeter is incredibly easy, and it can tell you a lot about the electrical systems in your vehicle. There is a bit of a learning curve, especially if you buy a cheaper multimeter, but you will be off and running in no time. However, if a multimeter is easy to use, be warned that electrical problems can be some of the most difficult issues to diagnose. Not only do you have to have a decent understanding of the wiring in your vehicle, but many electrical issues are not clear-cut or easy to solve. Damaged wiring can even lead to the dreaded intermittent failure, where everything seems fine when you are testing it in your garage, only for the system to fail when exposed to vibration and temperature swings out on the road. Still, learning how to use a multimeter is the vital first step in tackling the numerous electrical systems in your vehicle.