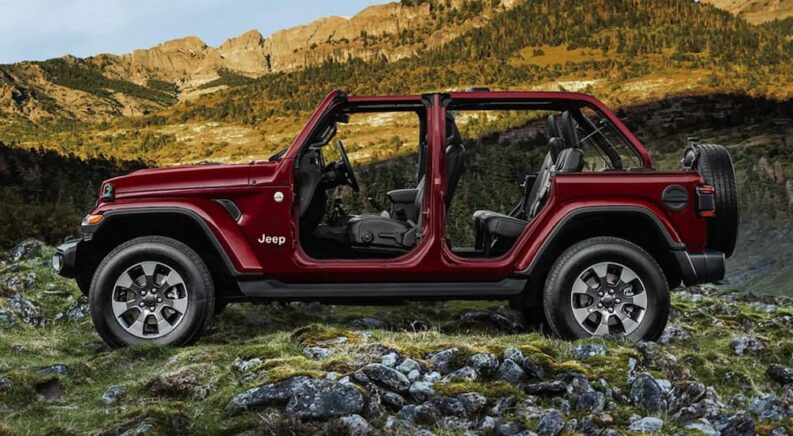
So you just got a new Jeep and love being out in the sun, enjoying the summer weather, a fresh breeze on your face, and the freedom that only comes from the open road. You’ve seen all the other cool kids with their Jeep doors and hardtop removed. “How do I do that?” you wonder. It’s a rather simple task, actually, since Jeep made it as intuitive as possible. Follow these simple instructions and you’ll be happy you found your used Jeep Wrangler for sale near Cincinnati.
The following instructions are based on a 2022 Jeep Wrangler and Gladiator, so while there may be some minor differences between years, all the principles are basically the same. The process is essentially the removal of the retaining screws on the door hinges, unplugging the door electrical cable, undoing a final retaining screw, and removing and storing the doors. The hard top roof follows a similar procedure, with a few more screws and another wire harness. With a little determination, you’ll be driving down the road to your favorite beach in just a few short minutes.
Door Removal
The doors are pretty simple to remove. All you’ll need for equipment is the tool kit Jeep includes with their vehicles. If you bought your Jeep used or lost your kit, you’ll need a T-40 bit and T-50 bit and a ratchet or screwdriver. A ratchet will be easier to use when unscrewing, especially when the screws are properly torqued down.
Before starting, it is recommended to roll down all your windows; while this is not essential to door removal, it makes holding, moving, and storing them safer and less likely to accidentally break the glass. Also, preparing an area to store your doors when not in use before you remove them is highly recommended. Few things are more frustrating than holding a heavy door and trying to figure out where to put it down. A 2×4 or some other semi-rigid but soft material is a great surface because storing directly on concrete could result in scratches and damage to the bottom of your door.
First off, to remove the front doors, you’ll want to start with the wire harnesses under the plastic covers. To find the harnesses, simply open the door and follow the electrical cable from the door to where it disappears into a plastic cover. The cover should be simple to pop off, revealing the wire harness. Some of the Jeep wire connectors are more or less complicated than others, but on a 2022 model, you’ll need to slide the red clip up and depress a black button to release the white rotating piece, which frees up the connector. (It is a bit complicated on your first try, but after the first time getting it, you’ll be a pro.) Once you remove the wire connector from the harness, you can remove the screws to free the door.
Each door has three screws. Two of the screws are located on the underside of the door hinge. They should be easy to locate, and these screws are the T-50 Torx screws. These are most easily removed while the door is closed. Be careful not to dent your door or scratch the paint. Just take your time, and you’ll be happier with the end results than if you rush it. Once these screws have been removed, you have only one left. This T-40 screw is located on a small bracket that attaches to the frame of the Jeep. It is only visible when the door is open. This bracket is extended from the door when the door is open, and you’ll want to make sure that it stays that way.
Once you remove the T-40 screw, make sure not to close your door, or this will push the bracket back into the door and make it much harder to reinstall. With all three screws removed, the door is free but still in place. Be careful that it does not swing and dent your Jeep at this point. Many Jeeps have a dent where a door has swung freely and collided. The door can now be lifted vertically, which will pull the door hinges out of their bracket, and the door can be put in storage until you are ready to reinstall it.
The rear doors are much the same as the front doors. One tip to make it easier to remove the rear doors is to first slide the front seats forward, to make accessing the rear wire harness panels easier. Removing the rear wire connections is just like the front ones, but the connections are simpler and thus require fewer steps to unplug. Simply push the retainer button, and the connection should slip out. Proceed to the removal of the T-50 door hinge screws and then the T-40 bracket screw. Lift the door free and move it to storage. Success! You have removed both the front and rear doors to your Jeep.
Roof Removal
The hardtop on the Jeep can be pretty easily removed. Many people just remove the front hard top pieces because the back is a bit more difficult, but by following these few simple steps, you too can enjoy the freedom of a wide-open Jeep. The front hardtop pieces are removed by rotating the quick disconnect brackets and unclipping the clips. There should be about six of them. Once they are all off, you can remove the driver’s side top, then the passenger side top; they need to be removed in this order because of how the weather seal configures between the sections. They also must be reinstalled in the reverse order: passenger side first and driver’s side second.
Once the front hardtops have been removed, you can move along to remove the rear hardtop. There are six T-50 Torx bit screws you’ll need to remove, but only five of them are visible. These screws are located around the rear of the interior and connect the hardtop to the frame. Remove the five visible screws, and you’ll notice a plastic cover on the driver’s side in the rear of the Jeep. This plastic cover can be removed, and the wire cables connecting the rear hardtop to the Jeep can be disconnected. The connector should be similar to the rear door connector. Then, the final screw can be removed from the six screws attaching it to the frame.
Finally, you’ll have two T-50 screws on the top of the Jeep, where you would expect to find a roof rack connecting the hard top to the frame on top; remove these to free the rear hard top. Make sure you have a place to store it; similar to the doors, you’ll want to put the top on a softer surface than concrete to prevent damage. Jeep also includes some plastic brackets you can place on the bottom of the hardtop, which will help protect the edges. Your entire roof is now free, and the open air can freely flow through your Jeep. Driving has never felt so much like flying!
Final Thoughts
After following these instructions, you’ll have removed all the appropriate screws, disconnected any wires connecting the doors to the frame, and lifted the doors free and placed them in storage. In a similar way, the hardtop can be removed by unscrewing a few screws, unclipping a wire connector, and lifting it free of the Jeep. All the hardware you removed can be placed into the special container Jeep has designed for their cars; this is sometimes under the back seat and other times in the trunk. Either way, you’ll have a place to keep your bolts safe until you put your Jeep back together. In the meantime, enjoy the freedom of the open road, the sun on your face, the wind in your hair, your friends at your side, and the journey unfolding before you…