One of the most common things people say when talking about diesel engines, particularly when comparing them to standard gas engines, is that they require different sorts of maintenance—in particular, people love to mention how diesel engines don’t have spark plugs that need to be replaced. That’s true; diesel engines don’t have spark plugs, but they have glow plugs instead, and you still need to know about proper diesel glow plug maintenance. This is one of those situations where it’s important to remember that they’re different but also surprisingly similar in some key ways. So let’s take a look at what glow plugs are, how to tell if you might have an issue with yours, and how to replace them.
What Are Diesel Glow Plugs?
In order to understand what glow plugs are and how they function, it’s important to first have a basic understanding of diesel engines and how they differ from standard gas engines. Both types of engines have a lot in common: you have cylinders with pistons in them; the pistons enter the cylinder to compress air in it; fuel is injected into this cylinder; and then an explosion occurs that pushes the piston and rotates a crankshaft sending power out to other parts of the vehicle. These are the basics that both types of engines share, but the difference is how that explosion happens.
With a standard gas engine, a spark plug creates a spark that ignites the mixture of fuel and air within the cylinder to create that explosion or combustion. Diesel fuel doesn’t require a spark to combust; instead, the mixture of fuel and air is compressed to the point where it can ignite on its own, creating combustion and that explosion that drives everything else. In order for this to happen, however, the fuel needs to be hot enough to ignite when compressed—cold diesel fuel won’t combust within a diesel engine.
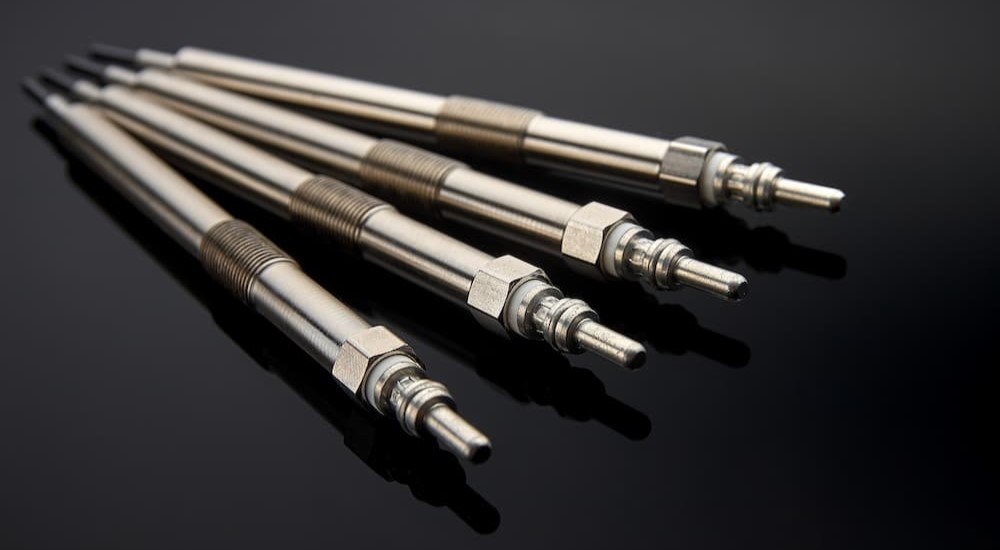
That’s where the glow plugs come in. Glow plugs are just tiny heaters inside your engine that warm the fuel to a proper temperature so that combustion can occur. They’re typically made from heat-resistant metal like platinum since they’re involved in heating and have a heating element with a temperature sensor. Your engine has one glow plug for each cylinder—same as gas engines have a spark plug for each cylinder—and that moment you have to wait before you can start your diesel engine each time is the glow plugs warming up.
Signs of Glow Plug Failure
Without heat, your diesel fuel can’t combust, so the surest sign of potential glow plug failure is when your engine won’t start. To be fair, quite a few things can cause your engine to not start—glow plugs need electricity to function, so a dead battery is just as big a problem. Overall, you’ll typically experience engine trouble like difficulty starting, poor acceleration or performance (including misfiring from your engine), and reduced fuel economy. If you ever see black smoke coming from your tailpipe, that’s a major indicator that something’s wrong with your engine, and a faulty or failing glow plug could be the culprit.
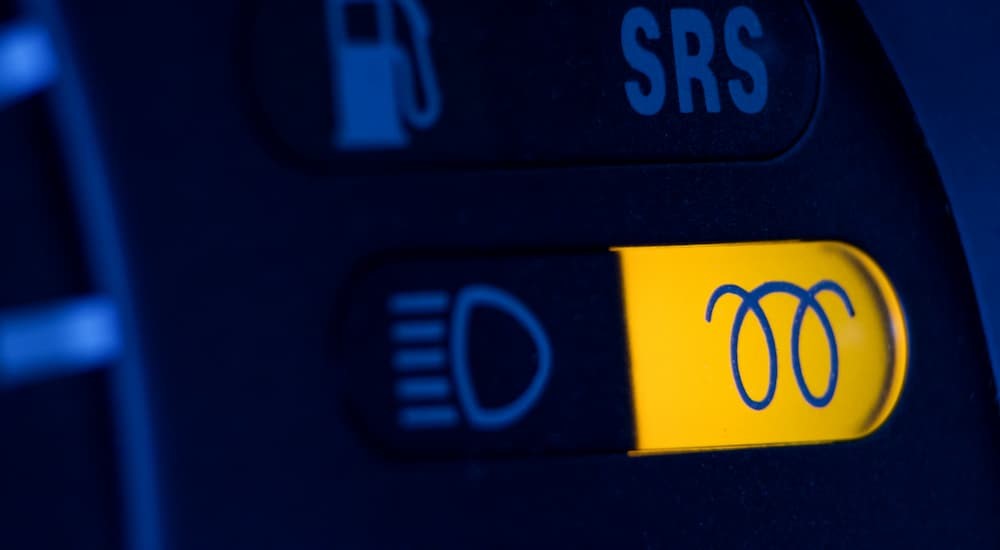
You can see the problem, though: there’s no single, clear indicator that a glow plug is failing. Your diesel vehicle might have a glow plug indicator light, which makes it really easy to know what the problem is; otherwise, your general check engine light can be the sign that you have a glow plug issue, which would require further testing or reading a diagnostic error code for your vehicle to determine exactly what the problem is.
Testing Your Glow Plugs
Testing your glow plugs can be easy, but you’ll need a multimeter. First, determine the inherent resistance of your multimeter: set it to Ohms, touch the two leads to each other, and make a note of the value displayed on your multimeter. If you already know this because you’ve used your multimeter for similar things, then you’re in good shape.
Now you’ll need to find the glow plugs on your engine. There’s one with each cylinder, and you can usually find them installed in the cylinder head—you’ll see a heavy-gauge wire attached to them. You might have to remove a cover to find them; check your owner’s manual or look up information online for your specific vehicle if you’re struggling with this. Once you find them, detach any caps on them and disconnect the wires connected to them.
Touch the negative (black) lead of your multimeter to the negative terminal on your vehicle’s battery—it will make life easier if you can secure the lead to the terminal, so you don’t have to hold it there. Now touch the positive (red) lead of your multimeter to a glow plug—your multimeter should display the resistance in Ohms. Subtract the inherent resistance you found earlier from this; the result is the actual resistance of the glow plug.
Now all you have to do is look at the factory specification for the glow plugs in your vehicle to see what it should be. If the number you’ve found in testing is outside what’s acceptable, you know your plug is faulty or dying and needs replacing. You’ll want to repeat this for each of your plugs to make sure they’re all good—you might only have one going bad, so test them all while you’re at it.
Replacing Your Diesel Glow Plugs
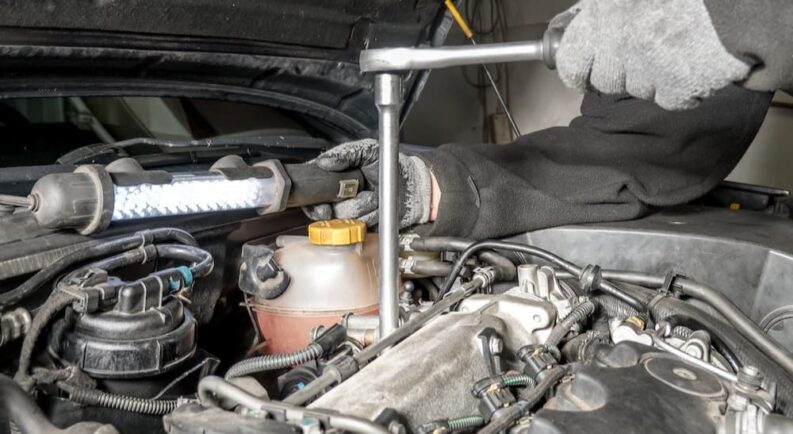
If you have a glow plug that needs to be replaced, then doing so is quite simple, especially if you’ve already gained access to them for testing. First, it’s a good idea to replace all of your glow plugs at once, so if one is faulty, swap them all out. Remember, you have one plug for each cylinder of your engine, so make sure you have enough before you start replacing.
To start, disconnect the negative (black) cable from your battery—since the glow plugs are connected to your vehicle’s electrical system, always disconnect the battery before replacing them. If you weren’t testing your glow plugs, you’ll need to locate them, remove any covers on them, and disconnect any electrical wires connected to them. The nice thing about replacing them after testing is that you already have all of this figured out.
You can use a socket and ratchet to unscrew and remove each glow plug; you might need a deep socket for this due to the shape of the glow plugs and where they’re located on the engine. Make sure you check each one as you remove it to ensure it’s not damaged, and remove the entire glow plug from your engine. This is a good time to check the area around where the glow plugs go and clean it off with a wire brush to make sure everything looks good.
Now insert a new glow plug into position and hand-tighten it. Then use your socket and ratchet to snug-tighten each one into place but don’t go overboard; over-tightening can potentially damage the glow plugs, so just get them snug. Finally, reconnect the wires for each glow plug, so they get power, replace any cover that was on them, and reconnect your car battery as the final step. That should be it—just remember that it’s always a good idea to find information for your specific make and model before doing this sort of work, so you know exactly what you need to do.
Always Get Ahead of Engine Problems
Keeping an eye on and replacing glow plugs is pretty easy, plus a glow plug should last about 100,000 miles so this isn’t something you’ll need to do very often. Of course, faulty or damaged plugs aren’t going to last that long, so it’s a good idea to know how to check them and do some simple maintenance. Like any other vehicle maintenance, getting ahead of problems and fixing them when they’re small is best. If you have a dying glow plug, ignoring it can reduce your engine’s performance and even potentially damage it as things aren’t working the way they’re designed. Stay on top of simple maintenance and take care of things today so you won’t have bigger and more expensive problems tomorrow.